
Introduction
This guide is for He Travel agents to get to know and use the Theta S camera for the creation of content in the form of still and video photospheres. Because knowledge of the technical aspects, as well as the differences between conventional photography and vr photography, will make for better content we urge you to read this guide in it’s entirety.
The Ricoh Theta S is a small, lightweight camera that has a lens on both the front and back. It will take 360 degree spherical panoramic images and video. It can be synchronized with smartphones via wi-fi and accessed with the dedicated app. It is not waterproof or shockproof.
Always consider if you should shoot video or stills. If the scene has a lot of movement shoot video. Never shoot video under 2 minutes long. If you are shooting something like a dance performance please try to start at the beginning of a song and leave it running until it’s over. Always try to use a tripod for video.
If there is interesting sound but not much movement then shoot a photosphere but record some audio. A photosphere can still play an audio clip. This can make for a great user experience as they get a high-res, focused image but have audio playing at the same time. You can record audio using the theta in video mode or just use your cell phone with an audio app.
Camera Parts
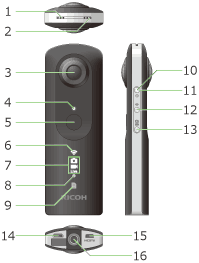
- Microphone
- Speaker
- Lens – Be careful when handling the lens section.
- Camera Status Lamp
Lit in blue: Camera can be used.
Flashing in blue: Sleep mode (power saving).
Lit in red: An error is occurring in the electromagnetic compass. (Videos can be taken)
Flashing in red: An error has occurred in the camera.
Lit in green: Shooting is possible with self-timer. *Except when captured with HDR rendering set as the auto mode.
Flashing in green: Sleep mode (power saving) for shooting with self-timer.
Unlit: Shooting is not possible as no more images can be taken/no more time remains. The lamp is also unlit during shooting. - Shutter Button – Press to capture images and/or start video.
- Wireless Lamp
Lit in blue: Wi-FI function on (connected to Wi-Fi network)
Flashing in blue: Wi-FI function on (not connected to Wi-Fi network)
Unlit: Wi-Fi function off - Shooting Mode Lamp – The lamp that corresponds to the selected shooting mode lights. When a lamp is flashing, shooting is not possible because internal processing is in progress.
- Video Recording Lamp – Flashes while a video is being shot.
- Memory Warning Lamp
Indicates the remaining number of photos that can be taken with the display status.
Unlit: Remaining number of photos that can be taken: More than 400 (Remaining memory: More than 25%)
Lit: Remaining number of photos that can be taken: More than 160, less than 400 (Remaining memory: More than 10%, less than 25%)
Flashing: Remaining number of photos that can be taken: Less than 160 (Remaining memory: Less than 10%) - Power Lamp – Displays the power status.
- Power Button – Turns the power on/off.
- Wireless Button – Turns the wireless function on/off.
- Shooting Mode Button – Switches between the still image capture mode and video capture mode. Press and hold this while turning the power on to switch to live streaming mode.
- USB Terminal – Connect to your computer using the provided USB cable.
- HDMI Terminal – Used for live streaming mode.
- Tripod Mount Hole – When using a tripod, take care not to overtighten the screws.
Gear
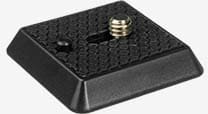
The Theta can be attached to a tripod, monopod, clamp mount, flexy mount or anything that uses the standard tripod connector. Sometimes you will have to hold it above your head. What you use depends on the circumstance of the shoot. One handy item to carry is the quick-release plate that attaches the Theta to a standard tripod. Its shape will allow you to stand the Theta on most surfaces without tipping over. Some quick-release plates are too small to keep the Theta stable. Be sure the one you have is safe to use.
- Tripod: when ever possible, use one of the above mentioned devices when shooting. Video should especially be still as movement can compromise the vr experience. Because the Theta shoots in every direction the tripod footprint should be as small as possible so less of the tripod is in the image.
- Monopod: a monopod is especially useful in a crowd or area where you are unable to setup a tripod. Be sure the camera is well above your head.
- Cell phone: you will need a cell phone and the Theta app if you plan to use live view, change camera settings, remote trigger, save images to your phone and interval trigger. While it is possible to do a shoot without the app it is not optimal. The app can be downloaded here. You can also use a cell phone for live streaming.
- Laptop and/or charging device: if you need to recharge the Theta battery you will need a computer with a usb port or a portable charging device. If you plan to shoot a lot of video or stills you might need a laptop to backup your content. You can use a laptop for live streaming if it has an internet connection.
- USB cable: if you need to recharge or save content you will need the USB cable that comes with the Theta. It is advised to use it rather than a different cable.
- Audio: the mic and preamps are not very powerful. An audio source that is close to the Theta records quite well but if you need audio that isn’t close to the camera then you will need to use another audio recording device and mix it in post production. In most cases a He Travel developer will do the editing so just include the audio file in the files you provide. An external audio recorder is also needed if the audio is so loud that it over-drives the Theta mic.
- Camera pouch: Use the camera pouch when you’re not shooting to prevent scratches and to keep the device clean. Always remember to protect the lenses.
Formats and Resolutions
Top
Video is stored on the camera in dual fish-eye mode which isn’t useful for our purposes. The desktop app will convert the video to equirectangular mode which is what we use. By default, the program will take your file name and add _er to it. The file is saved in the same directory that the original video file was in. The software stitches the images together and injects the meta video meta data in the file. If you further edit the file using something like Premiere you will need to inject the meta data again. To do that you will need the software that injects the meta data. It can be found here. Do not upload to youtube without first injecting the meta data. Once injected, YouTube will read the meta data and add the 360 degree video controls automatically. If you are sending the video to He Travel developers for editing they will take care of the conversion and meta data injection.
Stills are stored on the camera and/or uploaded to a cell phone depending on how they are shot. If you use the phone app to monitor the image it will be uploaded via wi-fi to the camera. Photos you take are automatically stitched. Any altering of the size or cropping WILL break the ability for readers to see it as a photosphere.
- Still: JPEG file of 5376 x 2688 or 2048 x 1024.
- Video: MP4 file of 1920 x 1080 (30p) or 1280 x 720 (15p)
Generally you should shoot for the highest resolution for our projects unless otherwise advised.
Prepare for Shoot
Top
Be sure the Theta is fully charged.
Determine if you’ll use a tripod, quick release plate, monopod or your hand. Using your hand is the least preferred method but there are times when it’s the only option. Regardless you should ALWAYS CARRY A QUICK RELEASE PLATE. It comes in handy on any shoot and can fit in your pocket. You’ll find there is usually a spot where it’ll work. Use it even if you’re using your hand and hold it instead of the Theta.
Will you need a laptop? If you plan to shoot a lot of video or leave the Theta on interval shooting then you’ll need a laptop to write the content to and for charging. Don’t forget the cable.
Shooting Modes
There are 4 ways to shoot stills.
1 – Press the shoot button. This is the worst option. It will shoot your hand. If you have to shoot in a hurry use the timed shutter instead.
2 – Timed shutter. With the Theta turned off you hold the wireless button down while pushing the power button to make the camera go into timed shutter mode. You can see it is in timed mode because the mode light will be green instead of blue. In this mode hitting the shoot button will make the camera countdown 5 seconds before shooting. This will give you time to get out of the shot or grab the bottom of the camera if you are using your hand.
3 – Interval shooting. The Theta can take a shot every 8 seconds or more by itself. 8 seconds is the fastest it can shoot. This is a great method for shooting time-lapse or to get a lot of shots to choose from. Once started it will continue to shoot even if you turn off your app. I find this method to be the best in most cases.
4 – From the app. This method requires that you’re connected to the Theta wifi. It will take a shot and then download it to the phone. Generally this is not a good method as it’s slow and you have to be close to the camera. Use it for advanced options discussed below.
Stills are sharper than video. By comparison video is soft. Shoot stills unless movement is going to be captured. Video is important though so always looks for interesting movement.
How to Shoot
Always consider how your shot will look to a VR headset user. Think of the camera as a head that can turn on its own. There are significant differences between video and stills. A still places the persons head in one spot and allows the user to look around. Take the shot and it’s ready to go as a still. But video is another story. The fact that the user CAN look around means you don’t want to take that away from them. This is very important. When shooting video your movement over-rides their ability to control where they are looking. That’s not good. If you are shooting video of something that is moving, like dancers, then setup the camera, stand far away from it and let it shoot. If you are moving, like on a zipline, then try to keep the camera from turning. Pick a direction and don’t change it. Rememember it is shooting in every direction. You might want to see something that is behind you but don’t move the camera to face it. Always leave it facing the same direction. This allows the headset user to move along with you but they are sill able to look around on their own.
IMPORTANT: The Theta tries to focus wide enough that everything is in focus. However I have noticed the sweet spot is around 5′. If you are shooting a subject, like a model or statue, then place the camera about 5′ away from it.
If you are shooting a model encourage them to utilize all the directions. In other words have them get above and under the camera as well as all around it.
Consider the small size of the Theta and put it in interesting places. This is another instance where your quick release plate comes in handy. There are a lot of locations where you couldn’t place your head but you can put the Theta.
Selfie Stick
Selfie sticks come in very handy. A 360° camera takes a snapshot of everything around you, so if you hold the camera directly with your hand, your hand & fingers will show up in the photo in form of an extreme close-up.
We call it the “giant fingers” problem and a selfie stick is the easiest way to avoid this. The best selfie sticks are the telescopic ones – you can extend them as much as you need. Even a stick one feet long is enough to make your hand appear normal sized in the photo.
A selfie stick is also great to get your camera higher up, above your head – some very interesting shots are possible that way.
It’s very important to get the camera as level as possible. Tilted cameras make bad photospheres.
The Sun
In regular photography, you’d typically avoid having the sun in the frame. If you are taking 360° photos however, the sun will be part of the shot no matter what.
When one of the lenses is facing the sun, this lens will receive much more light than the other. It often results in a halo around the stitching line.
There’s no way to avoid that completely. A good way to alleviate this issue is to make sure the sun is somewhere between the lenses and none of them is looking directly at it. Just rotate your camera to adjust this and remember that since this is a 360° photo, it doesn’t really matter in which direction your camera is rotated – everything around you will be visible anyway. In other words point the edge of the camera towards the sun and not the front/back sides.
Advanced Options
Top
If you are an experienced photographer you’ll be happy to know you can access the camera settings for ISO, shutter speed and white balance. These can only be accessed using the smart phone app. Use the app to visually see the results of your settings for fine tuning.
Post Production/Logos
Typically you can pass the video/photospheres to Robert for processing but if you don it yourself please read below.
Even in the best lighting the Theta can suffer from chromatic aberrations. Generally you’ll see it in the form of purple fringing. It can be removed in photoshop by feathering the area, picking purple and lowering the saturation.
The area that is straight down typically shows a tripod, quick release plate or the shooters fingers. This is where we place our logo.
Use these logos for stills and video respectively. They look crazy here but they straighten out in VR. Place them at the bottom of the image/video. It is important that they are placed exactly at the bottom of the screen. It will be warped otherwise.
Video logo![]()
Still logo
![]()
Metadata for Youtube
Your video file needs to include certain metadata for 360° playback to be enabled. Follow these instructions to install an app that will add the necessary metadata into a new file for you.
Create a 360-enabled file with an app
- Download the 360 Video Metadata app for Mac or Windows.
- Un-zip the file, then open the 360 Video Metadata app. If you’re on a Mac, you may need to right-click the app and then click Open.
- Select the video file.
- Select the checkbox for Spherical and click Save as. Do not select the “3D Top-bottom” checkbox. For more information, refer to upload instructions for virtual reality videos.
- Enter a name for the file that will be created.
- Save the file. A new file will be created automatically in the same location as the original file.
- Upload the new file to YouTube.